Saturday, December 28, 2013

FRENCH KNOT TUTORIAL


So, it turns out people have been trying to replicate my French Knot tops.
Even though I am flattered, let's leave it to the professionals.
If you're going to do it... do it right.
This project takes time & patience.  And if you have both, you can
create one of these bad boys.
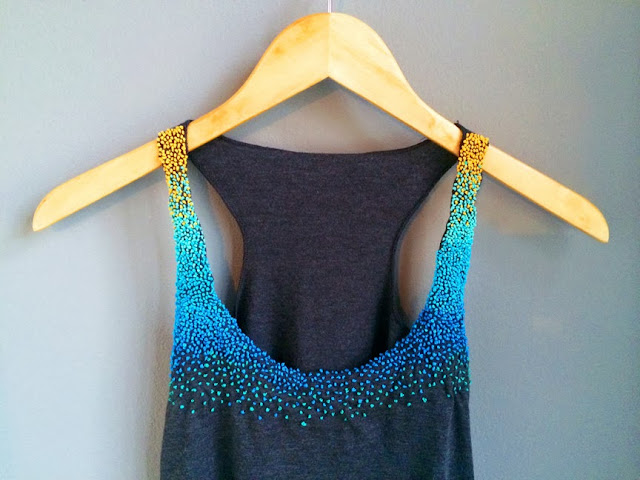
This is what your end result should look like:


Things you will need:
5 colors of embroidery floss
1 embroidery hoop
1 pair of fabric scissors
1 embroidery needle
1 clothes line clip
1 tank top


Step 1:

Take the strap of your tank top and put it in your embroidery hoop.
Stretch the fabric so its tight, but not so much that you damage the top.
Use your clothes pin to keep the excess fabric out of the way.


Start at the top with the lightest color, and work your way down to the darkest.

Here is a video that I found on youtube, this will
show you how to make a french knot.


Step 2: Cut off a piece of embroidery thread about 12 inches long. Make sure to tie off the end of the thread & work back to front. Make your first knot in the top corner of your tank top. It should look like this.
Now you work around that first knot & form clusters. Make sure to leave a small amount of space between the knots, the top looks the best when you can see a bit of the tank top color.
Step 3:
Once you get down to the last inch of thread and find it difficult to make another
knot, its time to tie off the thread and start another.
On the backside of the top you will need to make a knot so the string 
can't pass through the other side.
Use the thread from the other knots to tie it off.
Step 4:
Depending on how large your top is, each color of knots should be 
around an inch long before switching to the next color.
Towards the end, while you're on your final color,
start spreading the knots out further from each other to create
a fading effect.
Step 5: Mirror what you have done on the other side of your top. This is a tedious process but the results are worth it. Just sit on a comfortable couch & watch a few movies. You should send me your final results so I can see what you've  created.  If you need any help, shoot me an email. If you like what you see but are too lazy to make one... I have them for sale here: ETSY

Saturday, December 7, 2013

AN APPLE A DAY...

Here is the second pie I made for thanksgiving.
People really seemed to like this one... personally Im not an apple pie fan.
I've been called "un-American" for not liking it...
those people are ass hats.


I basically just ate the yummy crumb topping off of it &
let my husband eat the rest of it.

Here we go:

"DUTCH APPLE PIE"

This will be done in 3 steps... 
the ingredients will be listed for each step.
So look at the entire recipe before running to the store.

STEP 1


Ingredients:

Pie Crust:
1 1/2 cups of all-purpose flour
1 1/2 Tablespoon of sugar
1/2 cup oil
2 Tablespoons of cold milk


Directions:


Mix the dry ingredients together in the pie plate.


Make a well in the center of the dry ingredients and add the oil and milk mixture. Mix with a fork until dough comes together.
Press evenly on the bottom and sides of plate. Refrigerate while preparing filling and topping.


STEP 2


Ingredients:

The Filling:
1/2 cup of sugar
3 Tablespoons of flour
1 teaspoon of cinnamon
1/8 teaspoon of salt
6 cups of thinly sliced/peeled apples


Directions:

Preheat the oven to 375˚

In a large bowl combine the sugar, flour, cinnamon & salt.


Add the apple slices & mix together to coat. 
Take the apples and arrange them into your pie plate.


Final Step

STEP 3


Ingredients:

The Topping:
1 cup packed brown sugar
1/2 cup flour
1/2 cup of butter
1/2 cup of quick-cooking oats

Directions:

Stir together brown sugar, flour & oats.

Mix in 1/2 a cup of butter with a blender until it resembles course crumbs.
Sprinkle evenly over the pie filling.


Place pie on a cookie sheet to catch all the drippings.
Bake for 50 minutes or until the top layer is brown and the insides
are bubbling. 

Don't be a dumb dumb... let the pie cool before you pick off the crust to eat it.