Saturday, December 28, 2013

FRENCH KNOT TUTORIAL


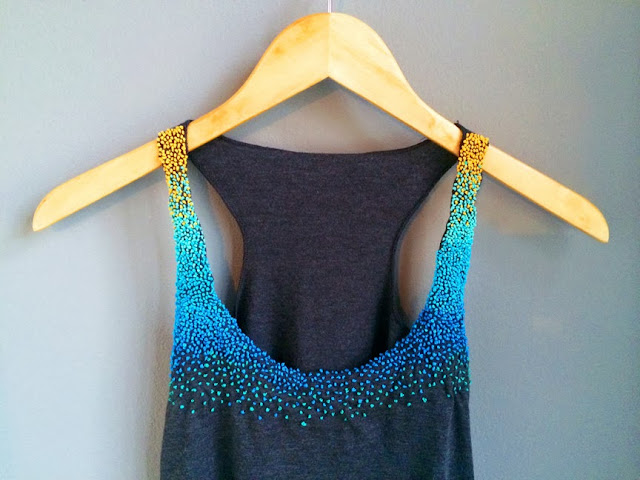
So, it turns out people have been trying to replicate my French Knot tops.
Even though I am flattered, let's leave it to the professionals.
If you're going to do it... do it right.
This project takes time & patience.  And if you have both, you can
create one of these bad boys.
This is what your end result should look like:


Things you will need:
5 colors of embroidery floss
1 embroidery hoop
1 pair of fabric scissors
1 embroidery needle
1 clothes line clip
1 tank top


Step 1:

Take the strap of your tank top and put it in your embroidery hoop.
Stretch the fabric so its tight, but not so much that you damage the top.
Use your clothes pin to keep the excess fabric out of the way.


Start at the top with the lightest color, and work your way down to the darkest.

Here is a video that I found on youtube, this will
show you how to make a french knot.


Step 2: Cut off a piece of embroidery thread about 12 inches long. Make sure to tie off the end of the thread & work back to front. Make your first knot in the top corner of your tank top. It should look like this.
Now you work around that first knot & form clusters. Make sure to leave a small amount of space between the knots, the top looks the best when you can see a bit of the tank top color.
Step 3:
Once you get down to the last inch of thread and find it difficult to make another
knot, its time to tie off the thread and start another.
On the backside of the top you will need to make a knot so the string 
can't pass through the other side.
Use the thread from the other knots to tie it off.
Step 4:
Depending on how large your top is, each color of knots should be 
around an inch long before switching to the next color.
Towards the end, while you're on your final color,
start spreading the knots out further from each other to create
a fading effect.
Step 5: Mirror what you have done on the other side of your top. This is a tedious process but the results are worth it. Just sit on a comfortable couch & watch a few movies. You should send me your final results so I can see what you've  created.  If you need any help, shoot me an email. If you like what you see but are too lazy to make one... I have them for sale here: ETSY

Saturday, December 7, 2013

AN APPLE A DAY...

Here is the second pie I made for thanksgiving.
People really seemed to like this one... personally Im not an apple pie fan.
I've been called "un-American" for not liking it...
those people are ass hats.


I basically just ate the yummy crumb topping off of it &
let my husband eat the rest of it.

Here we go:

"DUTCH APPLE PIE"

This will be done in 3 steps... 
the ingredients will be listed for each step.
So look at the entire recipe before running to the store.

STEP 1


Ingredients:

Pie Crust:
1 1/2 cups of all-purpose flour
1 1/2 Tablespoon of sugar
1/2 cup oil
2 Tablespoons of cold milk


Directions:


Mix the dry ingredients together in the pie plate.


Make a well in the center of the dry ingredients and add the oil and milk mixture. Mix with a fork until dough comes together.
Press evenly on the bottom and sides of plate. Refrigerate while preparing filling and topping.


STEP 2


Ingredients:

The Filling:
1/2 cup of sugar
3 Tablespoons of flour
1 teaspoon of cinnamon
1/8 teaspoon of salt
6 cups of thinly sliced/peeled apples


Directions:

Preheat the oven to 375˚

In a large bowl combine the sugar, flour, cinnamon & salt.


Add the apple slices & mix together to coat. 
Take the apples and arrange them into your pie plate.


Final Step

STEP 3


Ingredients:

The Topping:
1 cup packed brown sugar
1/2 cup flour
1/2 cup of butter
1/2 cup of quick-cooking oats

Directions:

Stir together brown sugar, flour & oats.

Mix in 1/2 a cup of butter with a blender until it resembles course crumbs.
Sprinkle evenly over the pie filling.


Place pie on a cookie sheet to catch all the drippings.
Bake for 50 minutes or until the top layer is brown and the insides
are bubbling. 

Don't be a dumb dumb... let the pie cool before you pick off the crust to eat it.


Wednesday, November 27, 2013

PIE, PIE, ME OH MY

Thanksgiving is tomorrow & there is too much to do.
I work half a day tomorrow and then have 2 hours to finish making
my meal before I host "Orphan Thanksgiving."

Today I will be making 2 pies.

Dutch Apple Pie & Mixed Berry Pie
This post will only feature the: 

"Mixed Berry Pie"


There are a few steps for the pie.
The first is the crust.
It will need to cool in the fridge for at least an hour... so keep that in mind.

The Crust


Ingredients:


1 cup (2 sticks) of unsalted butter
+ a little more for the pie plate
2.5 cups of all purpose flour
+ a little for rolling out the dough
1 teaspoon of salt
1 teaspoon of sugar
Ice water


Directions:

Cut each stick of butter into eight pieces & put in the fridge.


Mix the flour, salt & sugar into a large bowl.
Using a food processor blend the chilled butter into bowl with the 
flour mixture.
The mixture should resemble coarse meal with small pieces of butter visible.

If needed add a few teaspoons of the ice water and blend until the dough 
holds its shape.


Divide the dough into 2 equal parts, flatten & form into disk shapes
then stick them in 2 plastic baggies.

Chill in the fridge for at least an hour.


Now while the dough is chilling prep your 

Pie Filling

Ingredients:

1 cup of fresh strawberries, halved
2 cups of raspberries
1.2 cups of fresh blueberries
1/2 cup white sugar
3 tablespoons of cornstarch
1 egg beaten (for wash)


Directions:

Preheat oven to 375 degrees.

In a large bowl mix together the sugar & cornstarch.
Add the berries and toss with the sugar mixture.
Let them sit while you roll out the dough.
Roll out your dough large enough fill the bottom and sides of your
pie plate.


Grease your pie plate.
Lay out the rolled dough onto the plate and trim off any excess dough.


Now add the berry mixture into the crust lined pie plate.


Now roll the other dough out for your top.
Do something fun for the top...
I decided to make a polka-dot top.
 Press together the top and bottom dough.

Before putting it in the oven, take the egg and mix it up
to make the egg wash.
Take a pastry brush and brush on the egg all over the top crust.


To make sure the edges don't burn wrap them up with Aluminum foil.
Bake the pie for 25 minutes.
Once your timer goes off take off the foil and bake
for another 25 minutes, or until the top is golden.


Tuesday, November 12, 2013

TYPOGRAPHY ANNIVERSARY

Yesterday was my wedding anniversary.
YAY!!
This typography project was my husband's idea. He told me
what he planned on doing for me as a gift.
Once he explained to me what he wanted to do, I wanted to help & make
this a project we could spend time doing together.

We went to a thrift store & bought 2 floral paintings. 
One for each initial.

Here is how we did my â„’ .


The next step is finding the right Typeface for you.
My husband is a master typographer & hand drew both
letters. If you do not have the ability 
to create your own, go through your font book on your 
computer and choose your favorite.

I wanted a sassy script.

Now you can either free hand the letter
directly onto the painting or if you have carbon paper you
can trace it on the painting.
Center the letter on the painting, and start to transfer 
the letter.
We used chalk to draw directly on the painting.


It is a bit hard to see but, if you look hard
enough you can see the script â„’ .


The next step is to pick out your colors
We used my favorite , hot pink and sea foam.
Also, pick out a color to paint the frame; we used grey.


Now fill in the letter that you drew on the painting.
We not only painted in the letter but also added a drop shadow.

The last step is to paint the frame.

Here is my finished â„’ . 
Now it is time to work on his initial.


Hopefully you like this craft project we created.
If you are a friend of ours you might find one of these guys under your
Christmas tree from us.

Thursday, November 7, 2013

LETS START THIS PARTY RIGHT... WITH A CAKE

There really is no party... I just wanted to make a cake.

I have never successfully made a cake before unless it was from a box. 
I am a little anxious spending so much time on a dessert 
not knowing what it will taste like or if it will even turn out.
Go big or go home...right?

So, today I am going to make Martha Stewart's 

"Moist Devil's Food Cake"
(If you click on the picture it will pull up the the source of the recipe)


Start with the frosting, it takes about 3-4 hours to set in the fridge.
Also, this frosting recipe made way too much. I would 
suggest halving it.

Ingredients:

24 ounces of Nestle semisweet chocolate morsels
4 cups of whipping cream
1 teaspoon light corn syrup


Directions:

Place chocolate chips and cream into a saucepan. Cook over low heat,
stirring constantly, until combined & thickened, about 20-25 minutes.
Increase the heat to a medium low; cook, stirring, 3 more minutes.
Remove pan from the heat


Stir in corn syrup. Transfer frosting to a large metal bowl. Chill until 
cool enough to spread, about 3-4 hours. 
Check and stir every 20 minutes.


Now while the frosting is chilling in the fridge start that cake.


Ingredients:


3 sticks of unsalted room tempreture butter
3/4 cup Dutch-process cocoa powder
1/2 cup boiling water
2 1/4 cups of sugar
1 tablespoon of pure vanilla extract
4 large eggs, lightly beaten
3 cups sifted cake flour (not self-rising)
1 teaspoon baking soda
1/2 teaspoon salt
1 cup milk


Directions:

Preheat your oven to 350 degrees. 

You can either use 2 separate round cake pans or do what I did.
I only own 1 round cake pan, so it took twice as long to bake the cake.
Had to do each layer separately. 

Take the cake pan(s) and butter the inside of it, then take cocoa powder
and dust the buttered pan.Tap out any excess.

Sift cocoa powder into a medium bowl, and whisk in boiling water.
Set aside to cool.

In a large bowl cream the butter on a low speed until light & fluffy.
Gradually beat in sugar, 3-4 minutes. Scrape down the sides twice.
Beat inVanilla.
Drizzle in the eggs, one at a time, beating each addition until the
batter is not longer slick.


In a medium bowl, sift together flour, baking soda & salt. 

Whisk milk into reserved cocoa mixture.

Now, alternately mix the flour mixture & the cocoa mixture into the creamed butter.
Small amounts each time, start and end with flour.


Divide batter evenly between the pans. Bake until a cake
tester inserted into a center of each layer come out clean.
35-45 minutes.


Once baking is completed transfer to wire racks; let cool,15 minutes.
Now its time to spread that icing... once it has set.
Mine took around 4 hours to fully set.
Spread a layer in-between the 2 cakes and then cover the outside of the cake.


If you feel like it add some sprinkles

Tast Tester Tastebuds:


ME: I loved the cake, the icing was way too rich for my blood. I really like fudge icing, this was more of a ganache frosting.
CJ: I really liked the icing. The cake wasn't moist enough to be called "Moist devils food cake"

Monday, November 4, 2013

EASY BREEZY

Just returned from vacation...
And after not cooking or baking for nearly a week I needed
something simple to make.
You know the saying, "if you don't use it you loose it?"

Some veggie pancakes and a side salad.

Start with the salad.

"Arugula & Roasted Sweet Potato Salad"
(If you click on the picture it will pull up the the source of the recipe)

I changed this recipe a tad... and in my opinion made it better.


Ingredients:

2 sweet potatoes (about 1 ½ pounds)
coarse salt and fresh ground pepper
5 ounces baby arugula
¼ cup candied pecans
4 ounces fresh goat cheese, crumbled


Directions:


Peel the sweet potatoes and quarter them lengthwise. Slice crosswise into ½ inch pieces. Toss the sweet potatoes with salt & pepper on a baking sheet.


Roast at 450F until browned and tender 20-45 minutes. Remove from oven and let cool. 

Toss the roasted sweet potatoes with the arugula.  Top with pecans & goat cheese. 
We ate it with a raspberry vinaigrette dressing.


Part II

"Potato Zucchini Pancakes"

(If you click on the picture it will pull up the the source of the recipe)


Ingredients:

2 cups of peeled & grated potatoes
2 cups of grated zucchini
1/4 cup of diced onion
3 cloves of chopped garlic
2 tablespoons of olive oil
2 eggs
1/2 teaspoon of baking powder
1/3 cup of flour
1 teaspoon of salt, divided
Oil for pan


Directions:

Mix zucchini, potatoes and 1/2 teaspoon of salt. Place in colander for 10 minutes.
Squeeze out extra water with a paper towel.

Whisk the eggs in a bowl. Mix in the flour, baking powder and 1/2 teaspoon of salt.
Add Zucchini, potatoes, diced onions  and chopped garlic.

Heat the oil in a pan on medium heat.
Form patties out of the mixture and place in the heated pan.
Fry until crispy on both sides, flipping them when the edges turn brown.


CJ made a sauce to go with the pancakes.
He took an avocado, green onions, a green pepper, parsley and an onion
& put them through a food processor. Then mixed it with sour cream


Taste Tester Tastebuds:

ME: The salad was flavorful and filling. The pancakes could have been more crispy but that sauce was AMAZING. 
CJ: I agree that the pancakes could have been crispier, but the flavor was great and the sauce added a fresh taste that balanced out fried flavor.  I couldn't have imagined the sweet potatoes tasting that good in a salad.  Good texture and flavors.